
Menu:
Catan Table
Sometime around 2012 my dad gave me two steel end table frames. I finally decided what to use one of them for after I got my Glowforge and saw the files they posted to make your own Catan hexagon game pieces. I thought it would be cool to design a table top for one of the frames that would act as a removable game board, so I could take the board with me without bringing the heavy frame.
The original files can be found here.
My modified files are in the link below. I removed the interlocking puzzle features from the edges, changed some features that determine what areas can be engraved on each piece, and added dots under the numbers on the tokens, to show relative chance of rolling that number.
The image below shows what the file looks like for my modified version of the ore hexagon.

I found some suggestions for wood types that have natural colors corresponding to what each hexagon represents. I ordered a bunch of different wood types from The Wood & Shop Inc, and ended up using the following:
- Birdseye maple - harbors
- Mahogany - desert hexagon
- Maple - wool hexagons
- Padauk - brick hexagons
- East Indian Rosewood - lumber hexagons
- Red oak - tokens and table top
- Walnut - ore hexagons
- Yellowheart - grain hexagons
Below is an image of the original set of wood types I was choosing between.

After choosing the wood types, I did some test cuts to determine how much power and speed I needed to cut through each one, and what settings I would need to use for engraving. Most of the pieces use two different engraving settings to create different shades. The test parts are shown below.

The image below shows the ore hexagons while they are being engraved.

Once all of the hexagon pieces were cut I wanted to see what they would look like arranged in the game pattern. The image below shows all of the pieces before they were coated with polyurethane.

Before coating the parts with polyurethane, I designed an acrylic stand I could use for the parts to dry, so the edges wouldn't touch the surface they were sitting on. This part is shown below.

The image below shows some of the parts drying on the stands.

The paint on the frames was very worn out and there was rust all over when I got them. The image below shows what they looked like. At this point the only modification I made was to drill out the mounting holes to accommodate the screw size I planned to use.

I originally wanted the frames to be bare steel, so I took them to Seattle Powder Coat to have them sand blasted. The image below shows the frames after I got them back.

Next I used an angle grinder to remove some jagged edges from the legs, and to polish the steel so it was shiny. After I was done I wasn't really happy with the outcome because it wasn't very even. I was also told that if I did a clear powder coat, there was a good chance moisture would eventually get under the coating and start to rust the steel. So I decided to just have them powder coated black. The final result is shown below.

The first part of the table I needed to design was the mount assembly that would go on the frame to hold the table top and box. The box would go in the center to hold all of the game pieces. The top and box would both be removable. All of the parts would be laser cut. The mount needed to have features to hold the box, securely hold the table top, and allow for a good amount of position variation.
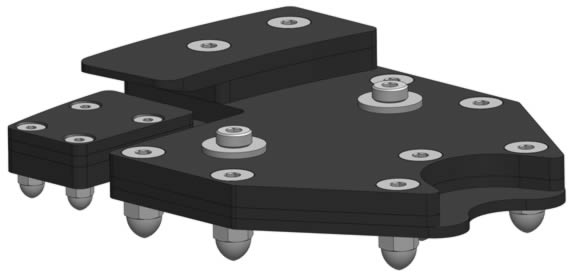
The position variation allowance was needed because the position of the legs and mounting features was not evenly spaced. I took a bunch of measurements on each table to figure out how much variation I needed to allow for. For the features that would hold the table top, I wanted it to use a twist motion to lock the top in place. I also added magnets that would provide a little extra holding force to keep the top from unlocking, although I think friction ended up being most of the resistance, so they may not have been necessary. The image below shows the mount design.
The following image shows the mount attached to the frame from underneath.
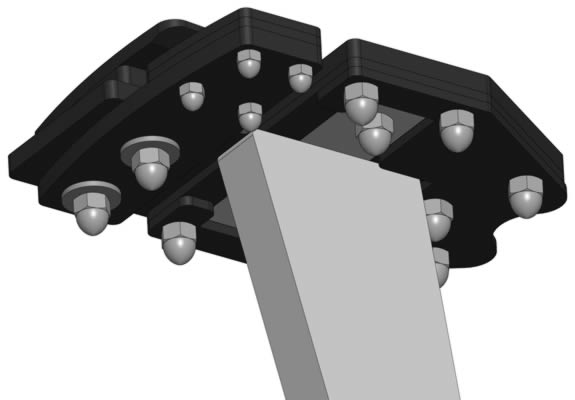
The portion of the mount that attaches to the frame does not have the position variation feature, which means the spot where the box sits needs to have extra clearance. The part that has the table top twist lock feature and magnet is able to float before the nuts are tightened. During assembly, the top would be put in place with the position allowance nuts loose, then when the top is twisted to the locked position, the nuts are tightened.
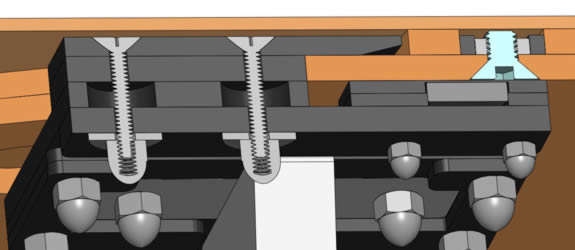
The image below shows a cross section of the mount with the frame and table top attached. The position variation feature can be seen where there is clearance around the two long screws. The top black piece is what locks the top in place. The light blue part is a steel screw that gets attracted to the magnet, which is the grey part just below it to the left. I didn't center the magnet under the screw so there would always be a pull when it was locked in place.
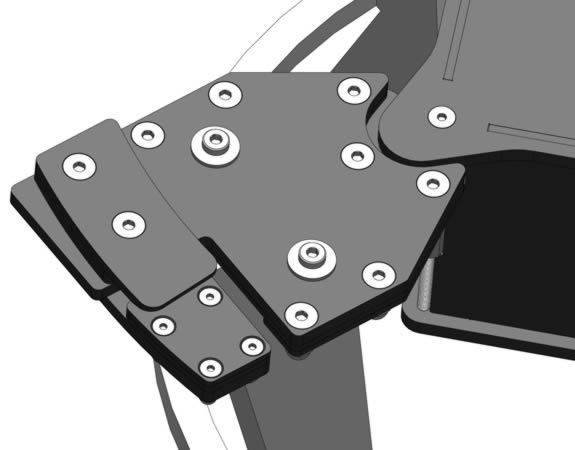
The image below shows the mount on the frame with the box resting on the mount. It shows the clearance between the mount and box to account for the position variation in the frame.
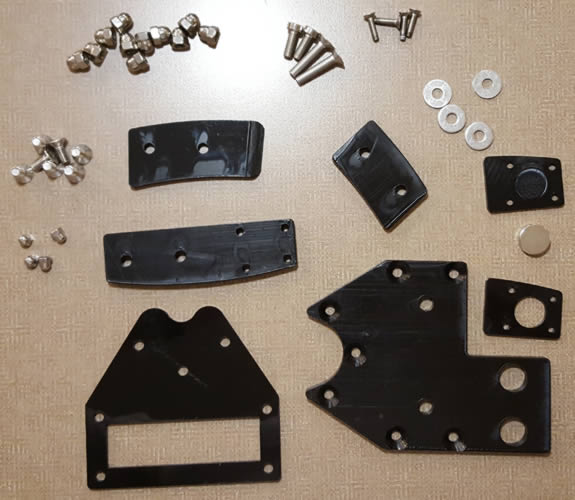
The image below shows all of the hardware and laser cut parts used to make each mount. The overhang feature that holds the top in place used a variable power 3D engrave to create a sloped contour on the leading edge that goes into the table top slot. I also used the engrave feature to create a pocket for the magnet to get it closer to the steel screw. I had to use a countersink bit for all of the flat head screws.
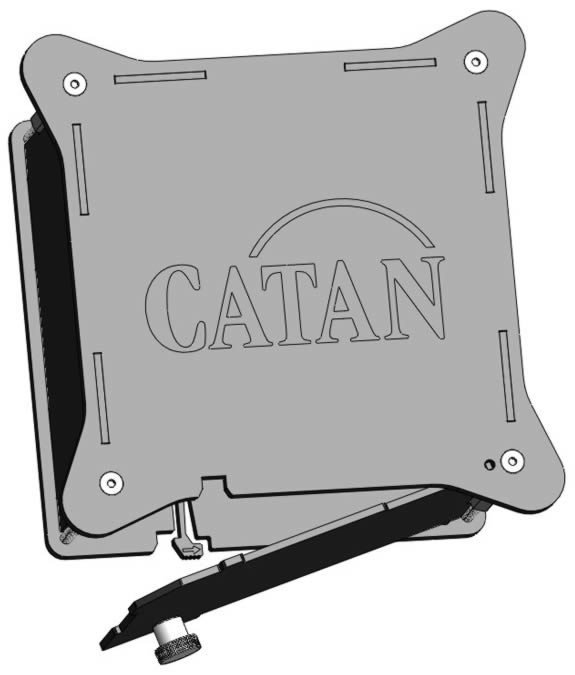
The design for the box that holds all of the game pieces is shown below. I made sure it was large enough to hold all of the game pieces, cards, and game instructions. I engraved the Catan logo on top, and used a snap feature to keep the door closed.
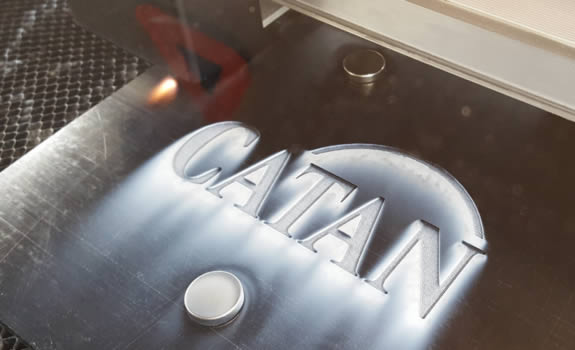
The image below shows the Catan logo being engraved. I had magnets on top of the material to keep it from vibrating and moving around; I'm not sure if this was necessary.
For the Catan logo, I decided to fill the engraved area with epoxy. The epoxy would be dyed with yellow pigment. Unfortunately I didn't test the color and epoxy combination at first and wasn't happy with how the first version turned out, shown on the left below. I also didn't test the snap feature on the bottom of the box and wasn't happy with how it turned out either, so I used that scrap piece to do more color testing, shown on the right below.
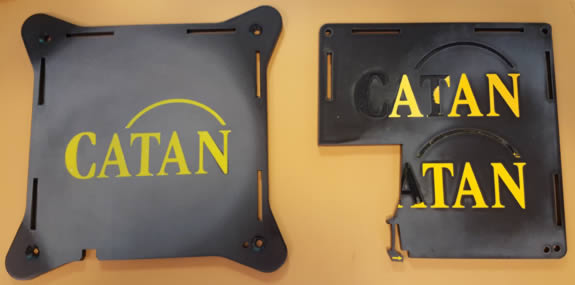
After I found the right color, I made the final parts and poured the epoxy over the engraved area. I also used it for an arrow on the snap showing how to unlock the door. These parts are shown below.
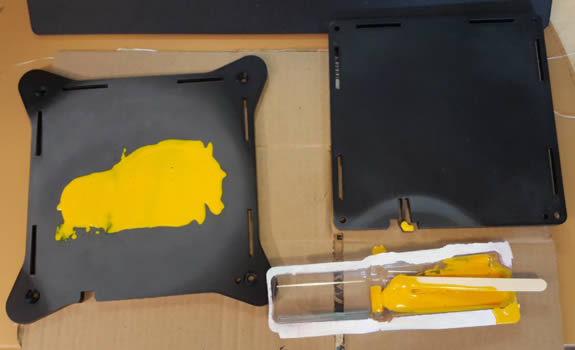
One of the most frustrating parts of this project was trying to get the acetal shiny again after sanding to remove the excess epoxy. I didn't want to use acrylic for the box because of how brittle it is. After I used a low grit sandpaper with my orbital sander to remove the epoxy above the acetal surface, I kept going up to higher and higher grit levels. I eventually ordered some sandpaper I found on Amazon that went as high as 10,000 grit.
I'm still not exactly sure what got me the result I wanted. I was testing a combination of wet and dry sanding, using higher and higher grit levels, and with different amounts of pressure. Sometimes a combination I was sure would help would instead make things worse, but I eventually got a result I was happy with, creating an almost mirror finish on the top of the box. There were a few small bubbles in the epoxy, but overall I was happy with the result. The image below shows the box next to the table frame with all of the mounts in place.
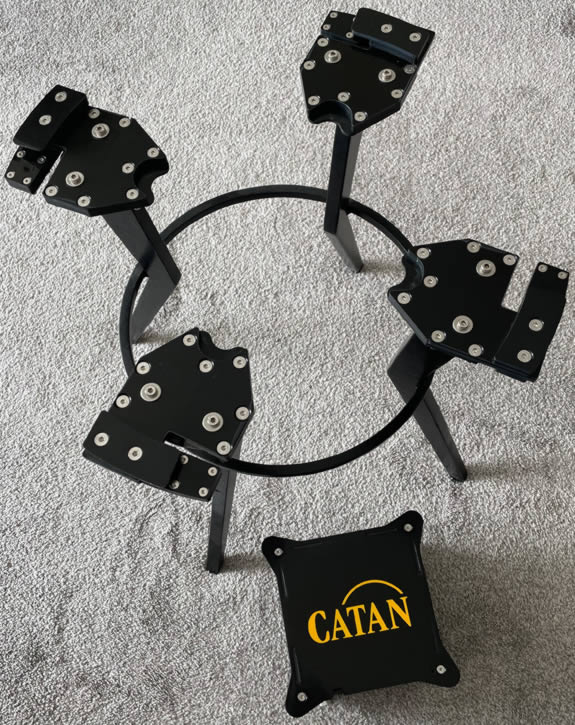
The image below shows the box in the center of the table. It was designed to sit just below the mounts so it wouldn't touch the table top. I also had to make sure I could fully open the door without hitting the table legs, so I wouldn't need to remove the box to open it.
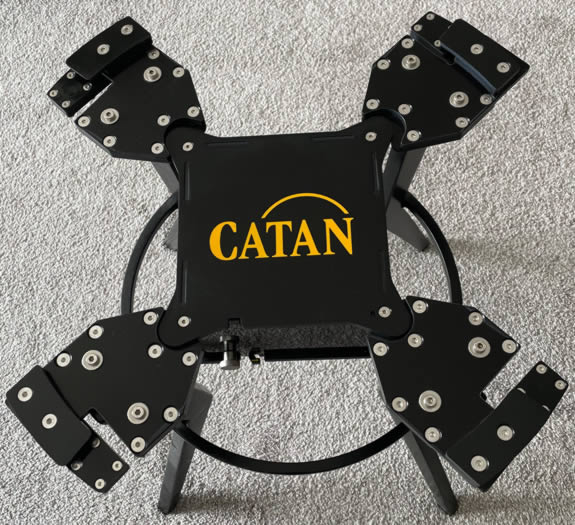
With the mounts and box finished, I could finalize the top design. It took me a long time to get to this point partly because I was waiting for the Glowforge passthrough feature to be enabled, which wasn't available when I got the laser cutter. I wanted to cut the top in quarters from 12" x 12" material, which is just barely too large in one dimension for the laser cutter without using the passthrough.
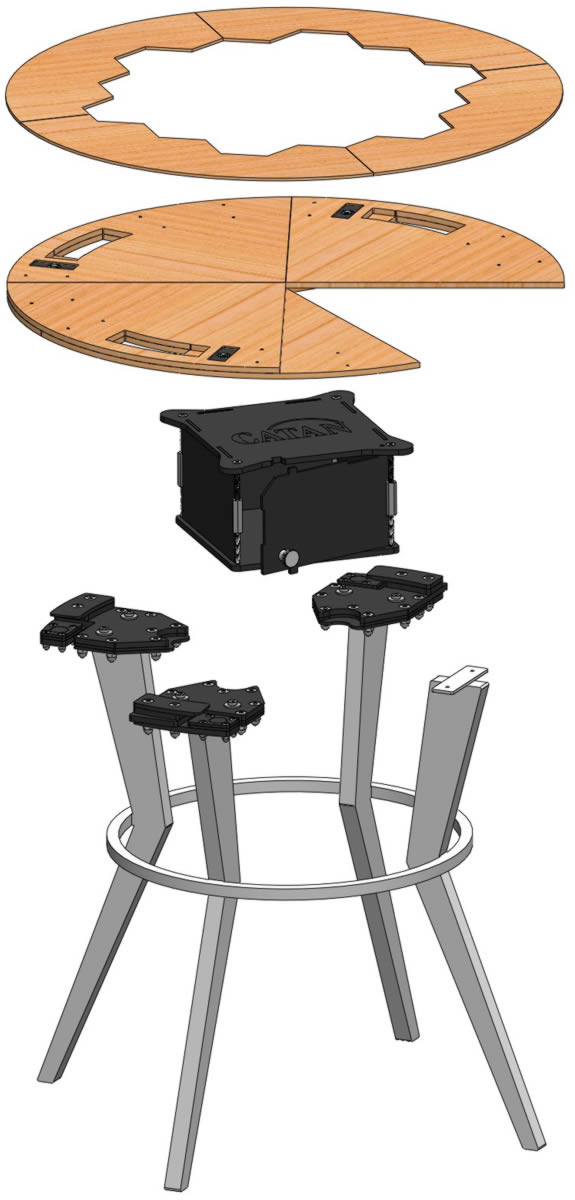
The final version of the table design is shown below, with several transparent top pieces to show the twist lock and magnet features. It also shows the dowel pins used to align the bottom two layers of the top. The top layer with the game piece cutout was manually aligned to cover the dowels.
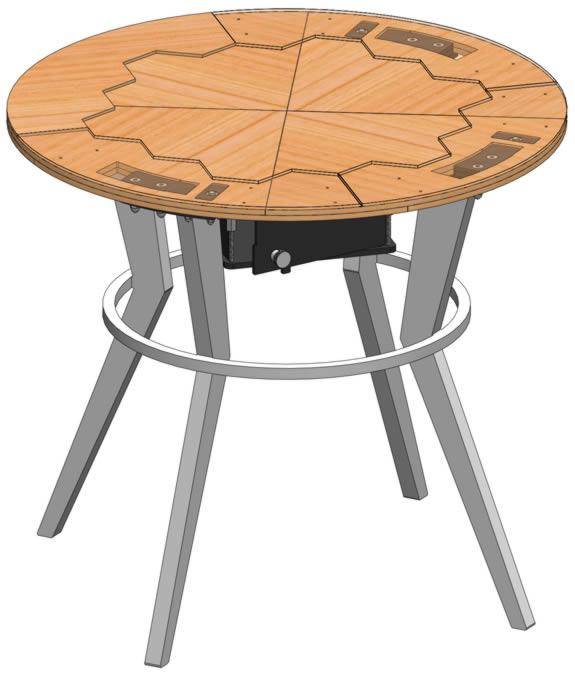
A partially exploded view of the assembly is shown below, with a few parts missing to show how everything goes together.
I wanted the table top to be blue, so it would look like water surrounding the game pieces. I wasn't able to find any wood that was naturally blue throughout, and I didn't want to dye the wood with artificial dye since all of the game pieces were naturally colored. I settled on using a natural dye. Earlier I had learned how to dye leather black for my Laser Stuff - Chair Cover project using vinegaroon (steel wool dissolved in vinegar). I discovered that it would also dye certain wood types blue.
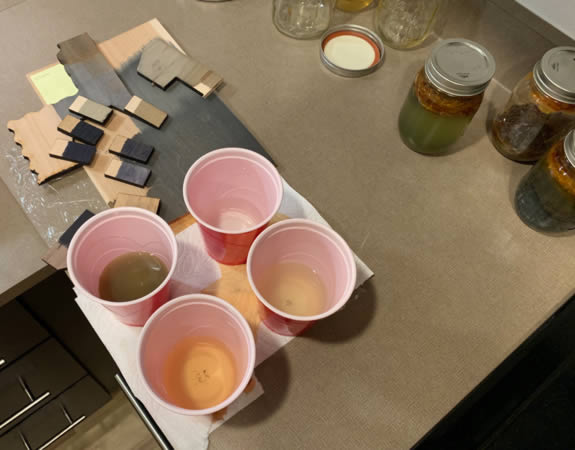
Early on I found out I would need to dilute the vinegaroon to get the right shade I wanted, but unfortunately diluting it with water caused it to rust pretty fast, adding some brown color to the wood. I experimented with a few different liquids to dilute the vinegaroon, and the best one ended up being just using vinegar to dilute it. This kept the liquid from rusting before it had fully dried. This experiment is shown below in the four different cups. Along with water and vinegar, I also tried lime juice and one more, but I can't remember what it was.
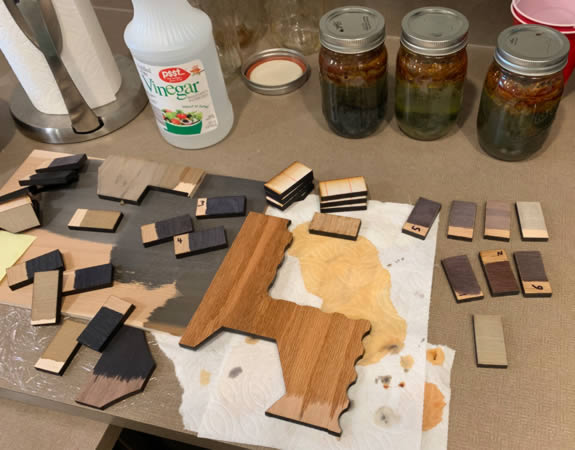
I tested a bunch of different dilution levels on several types of wood. The image below shows some of the samples, including the large one in the center before it had dried.
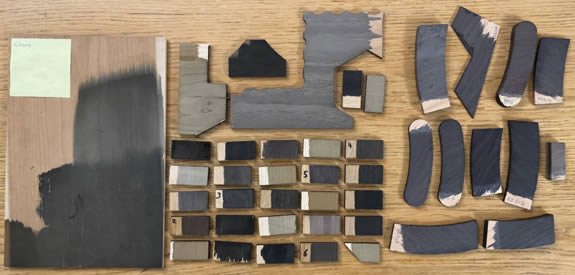
I ended up going with red oak, and a mixture of 1:15 vinegaroon to vinegar to get the shade I wanted. All of the samples I tested are shown below.
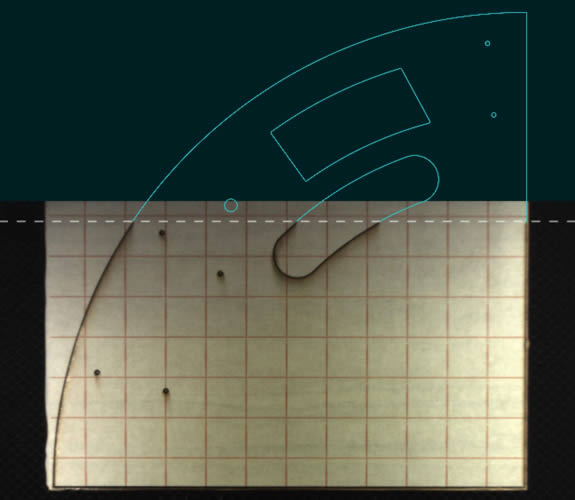
After I figured out what wood to use, I ordered a bunch and started cutting the table top quarters. Unfortunately I lost a few pieces to errors with the passthough software, but most cuts were successful, and I had ordered extra wood in case there were issues. The image below shows the alignment step after the first part of a piece was cut. The laser cutter uses its camera to find the end of the previous cut, and then after the material is shifted forward, it will continue cutting where it left off.
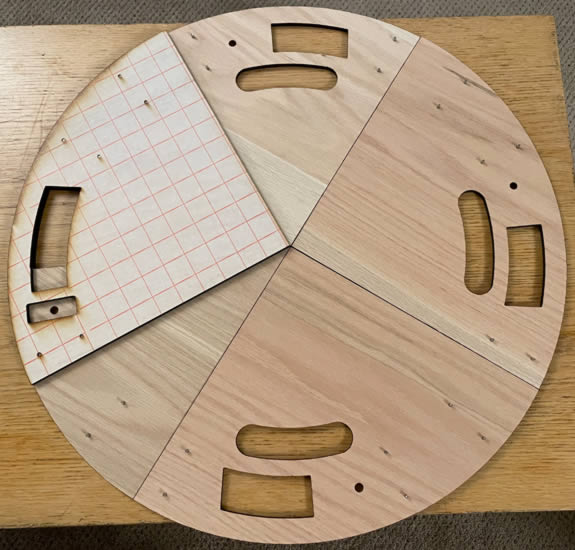
The image below shows the bottom layer of the table top with one of the middle pieces in place, with dowels aligning it over the bottom pieces. The pieces are offset so there is overlap between adjacent pieces, to add strength once they are glued together.
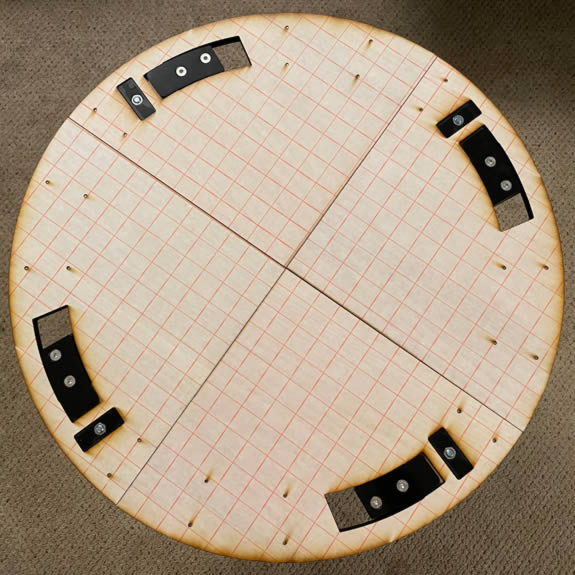
The image below shows the first test of the bottom and middle layers of the top held together with just dowel pins, placed on top of the mounts and rotated into the locked position. The steel screws that attract the magnets each screw into a nut, and the nut is captured in a rectangular piece of acetal. I was worried the nut might deform the wood and spin if I didn't capture it in plastic.
The video below shows how the top is rotated and locked onto the mounts.
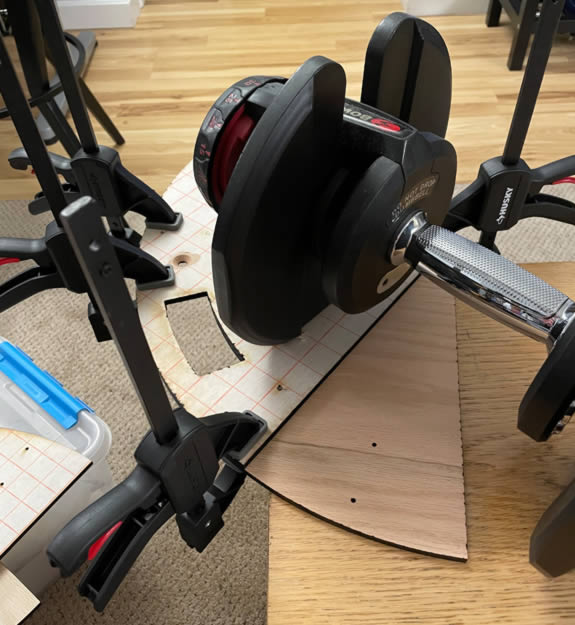
Once I knew the functional parts of the table were working as expected, it was time to glue everything together. The image below shows the first two pieces with clamps and a weight on top while the glue dried.
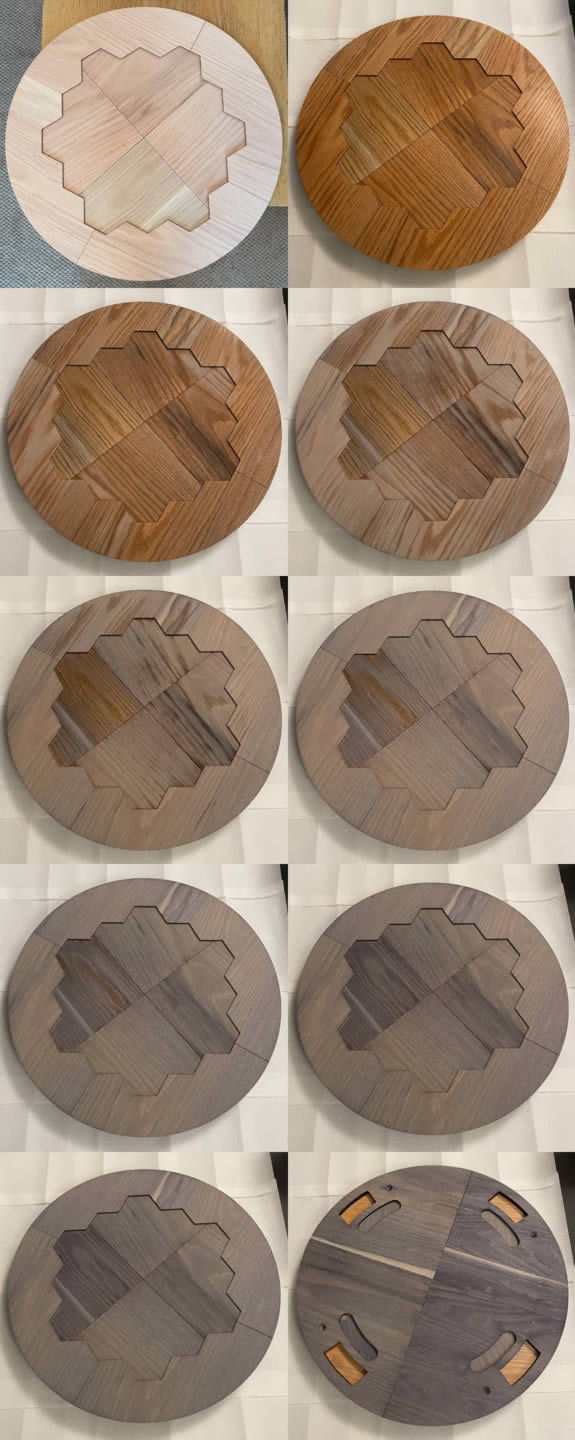
After all 12 wood parts were glued together, I mixed a bunch of dye, and started painting it over the entire board. The pictures below show several points in time while this was happening. The first is before the dye was applied, and the final two are the top and bottom after it was fully dry. After the dye was applied it took about two hours to fully dry and complete the color change.
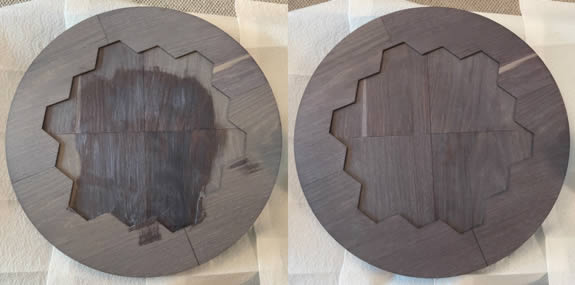
After the dye was applied, it was time to coat the table in polyurethane. The image below shows polyurethane first being applied on the left, and after the first full coat had dried on the right.
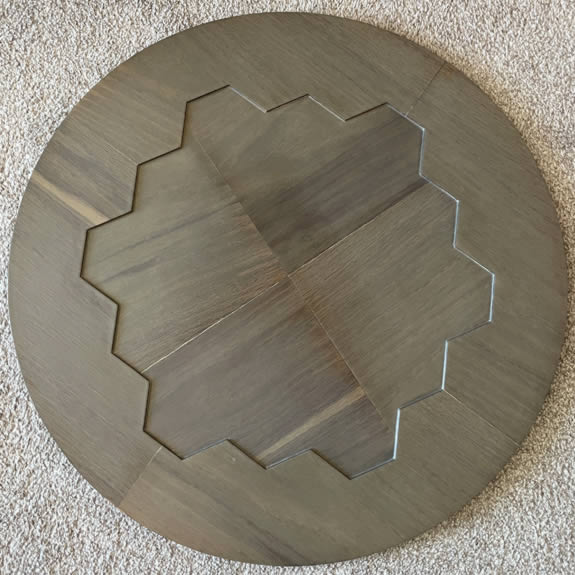
Unfortunately I made a big mistake while I was coating the table. There were some gaps in the wood where the pieces met in the center, and I assumed they were small enough I could use polyurethane to fill them. I ended up applying way more coats near these gaps, building up layers I then had to sand down. The texture started to look noticeably different in these areas, and the filled gaps turned solid white. I also applied so many coats to the entire top to even things out that it started to look more grey than blue. I had already spent so much time on this project, but didn't want to stop now with an end result I wasn't happy with, so I decided to remake the top. The ruined top is shown below.
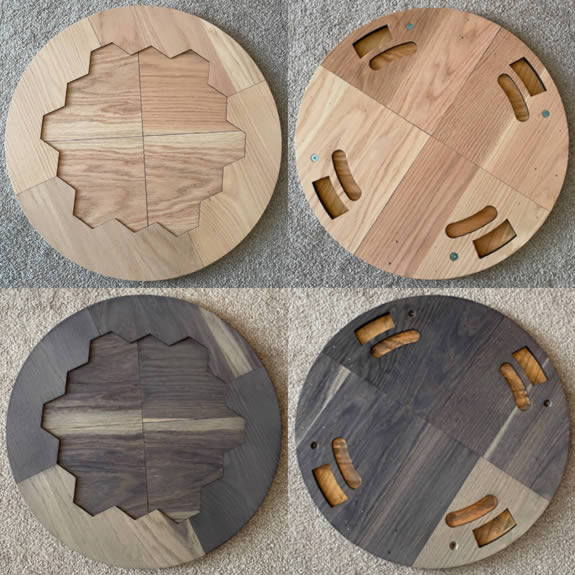
I ordered more wood, adjusted the edge offsets to try to make up for the gap, and remade all of the parts. Unfortunately the gap issue wasn't fixed, so I filled all of them with clear epoxy before dyeing the top. After several rounds of applying epoxy and sanding, I was happy with the result, and it was time to dye again. The image below shows the top and bottom before and after dyeing. There is quite a bit more area on this version that changed to a light grey instead of blue.
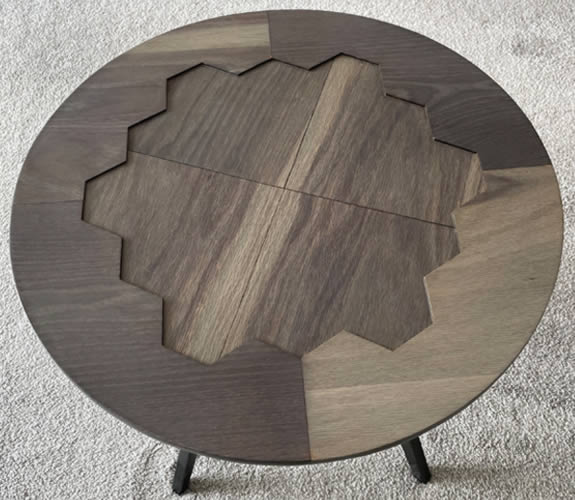
After dyeing the new top, I started applying coats of polyurethane, sanding in between several of them, before applying the final coats. It did turn out a little more grey compared to before coating, but overall much better than the first one. The finished table is shown below.
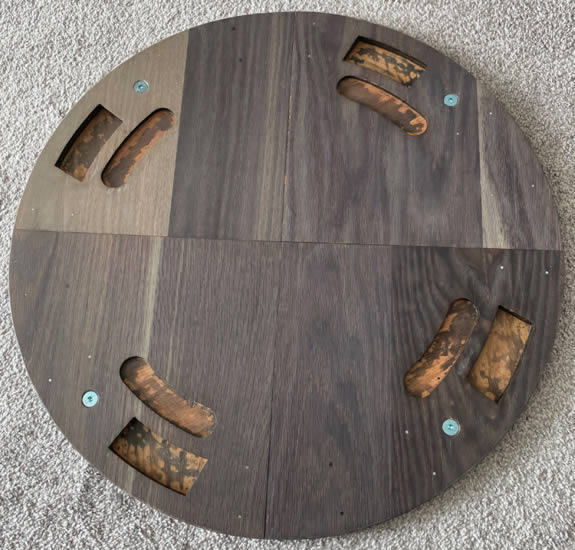
The image below shows the underside of the top, with the blue steel screws in place. The weird dyeing patterns inside the locking features are because those areas had wood glue over them as the table was being glued together, so the dye didn't penetrate evenly there.
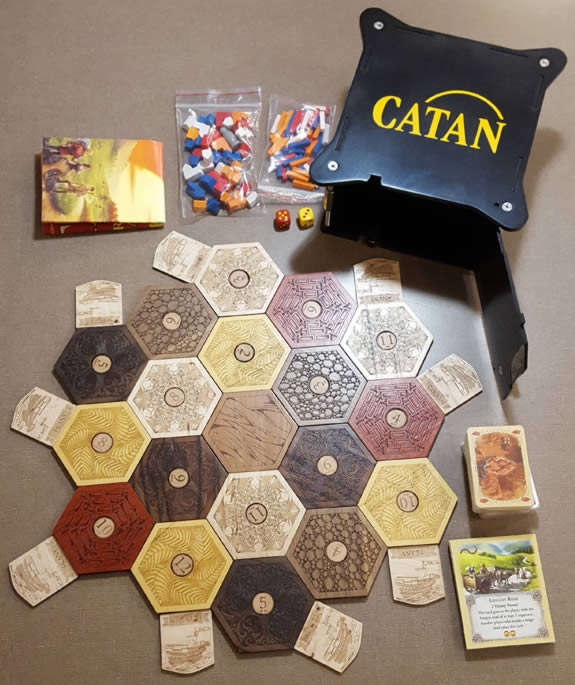
The finished game pieces, along with the cards and other parts from a set I bought, are shown below next to the box they all fit in.
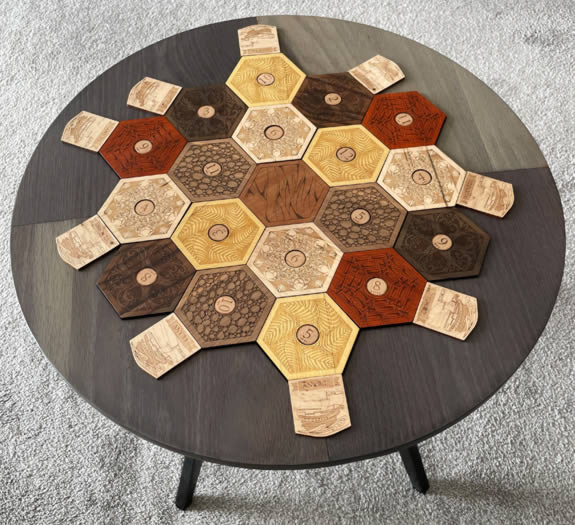
All of the custom wood game pieces are shown below in place on top of the table.
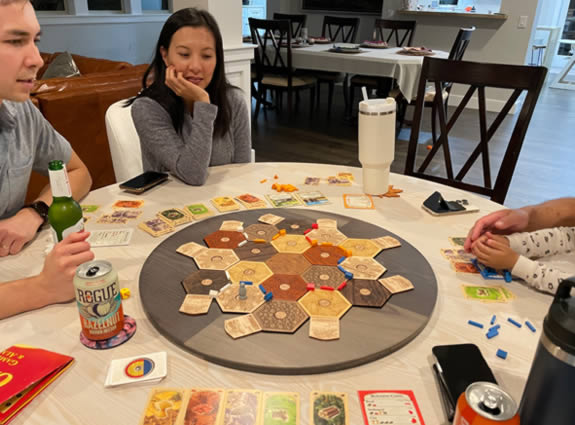
The image below shows the first ever game played on this new board at a friend's house, without the frame. One issue with playing on the actual table will be where to place all of the cards and other parts.
At some point I will probably make a different game table for the other frame. Hopefully the next one won't take me almost five years to complete.
Page created: 2019